S16 & 16mm Cameras
Browse 16 format cameras for sale at Visual Products

STANDARD 16MM

SUPER 16MM
CLICK HERE to learn the difference between Standard 16mm vs Super16mm
Standard 16mm VS. Super16mm
Standard 16mm vs. Super16mm
What’s the difference between a 16mm camera and Super 16mm camera? Which is better? Should you buy a standard 16mm camera or a Super 16 camera? For most customers, Super 16 is the way to go.
What is Super16mm?
Originally, all 16mm film stock had holes (called ‘perforations’ or simply ‘perfs’) on both sides of the film.
This was due to the fact that some cameras use dual registration pins, one on each side of the film gate. Some cameras have only one registration pin. Others have no pin and rely solely on the pull-down claw to position the film. This means that on cameras with one pin (or no pin) the holes on one side of the film are essentially wasted space that could be used to record image information if the perforations were removed. In the late 1960’s, this realization led to the birth of the Super 16mm format (here’s a link to an article about the birth of the Super 16 format written by the man who invented it!). By widening the opening in the film gate to include the area of the negative that contained the unnecessary perfs and using single perf 16mm film stock, a larger image area was obtained on the same size 16mm film stock. Same cost for film, higher image quality!
Why Use Super16?
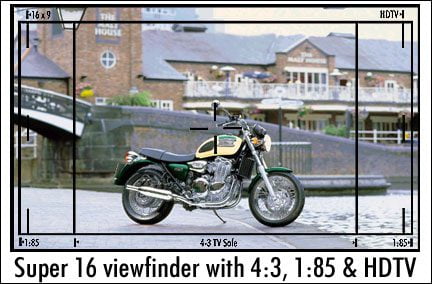
Super 16mm was invented to provide better image quality when ‘blowing up’ 16mm film to 35mm film for theatrical release. The standard 16mm frame is close to square. Its aspect ratio (the relationship between the width of the frame to the height of the frame) is 4:3—four units wide by three units high). For example, the scene below would appear like this in the viewfinder of a standard 16mm camera:
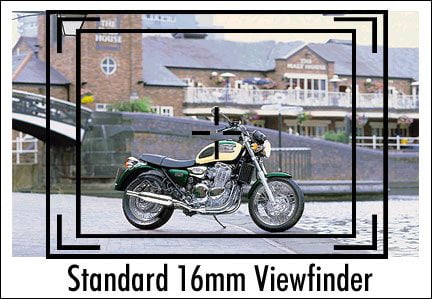
What do the markings in the standard 16mm viewfinder indicate? The outer most box is called ‘projection’. All of the image contained inside this box will appear when the image is projected on a 16mm projector. The four corners brackets just inside of the projection marking show what is called ‘TV Transmission’. If the film is transferred to standard definition video, the image contained inside these corner markings is what will be transmitted from a television station. However, not all of the transmitted picture actually shows up on a home television set. The box inside of the TV Transmission marking is called ‘TV Safe Action’. Not all television sets will lose the same amount of image area from the transmitted signal. Some sets will show more of the picture transmitted from the television station than other sets. However, the image inside the Safe Action marking box will most likely appear on all home television sets. Any part of the image you want to be sure ‘makes it home’, as they say, should be kept inside the Safe Action box. Unfortunately, where television is concerned, framing it is not an exact science.
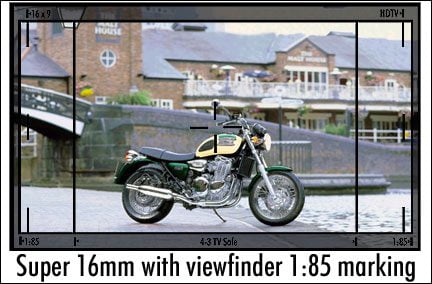
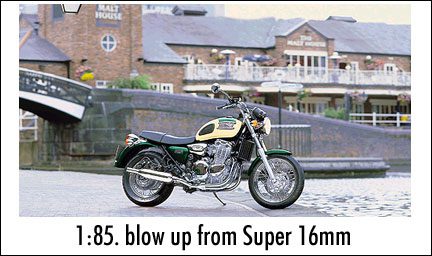
In the past, 16mm has been used as a source medium for productions that were intended to be released on 35mm film for exhibition in theatres. The idea being: save money on camera rental and film stock when shooting by using 16mm film stock and then optically ‘blow up’ the 16mm negative in post production to 35mm film stock for theatrical exhibition. Unfortunately, it’s not that simple. In the U.S. the most popular aspect ratio for 35mm theatrical release is 1.85:1 (1.85 units wide by 1 unit high). The 1:85:1 aspect ratio of 35mm is a much more rectangular aspect ratio than the 4:3 ratio of standard 16mm. When shooting for blow up to 1:85:1, the scene that was framed earlier through a standard 16mm viewfinder would look like this though a Super 16 viewfinder
Prior to the availability of Super 16mm, shooting 16mm and blowing up the negative to 35mm would require severely cropping the 16mm image in order to obtain the 1:85:1 aspect ratio of the 35mm theatrical release format (incidentally, this aspect ratio is normally referred to as simply ‘one-eight-five’). This required having to enlarge the image on the standard 16mm negative resulting in a loss of resolution and making the film grain much more apparent. Also, if the cropping necessitated in going from the 4:3 aspect ratio of standard 16 to the 1:85 ratio of 35mm was not anticipated when shooting, very poor framing could result in the blow up. If the scene above was shot in standard 16mm and then blown up to 35mm, this is the cropping that would result in order to go from the 16mm 4:3 ratio to the 1:85 ratio of 35mm:
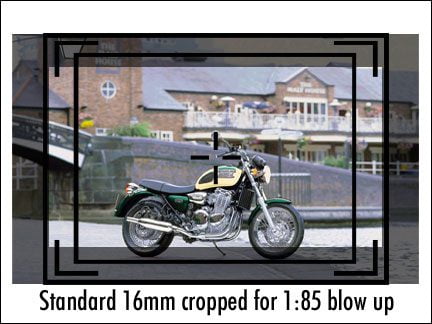
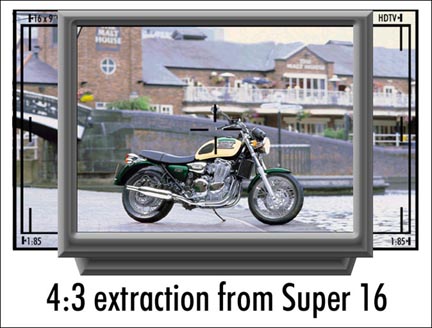
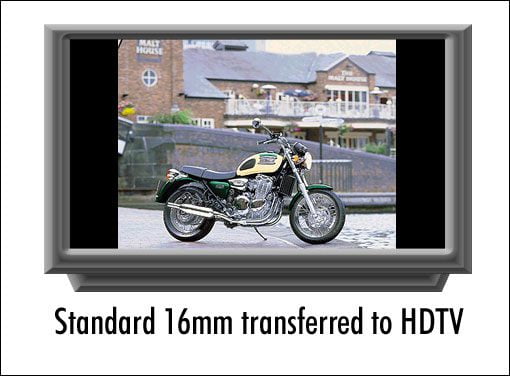
Not only is the original framing severely compromised, there is a serious loss of useful image area on the 16mm negative—the less negative area used, the lower the image quality. It should also be noted that an almost identical cropping results when transferring images shot on standard 16mm to the High Definition television format. The 16:9 (16 x 9) aspect ratio of HDTV is very close to the 1:85:1 aspect ratio of 35mm theatrical. Standard 16mm cropped for HDTV would require cropping the negative like this:
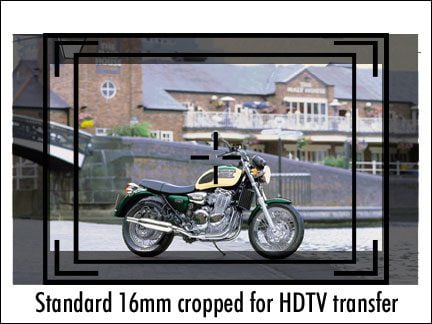
Again, notice how much of the original image area on the standard 16mm negative remains unused when the image is cropped for HDTV. When transferring film to video (standard or HD) you do gain the ability to reposition the extraction box (something not easily achieved when doing an optical blow up to 35mm). In this case the extraction box indicating what part of the negative will be used to make the HD picture could be moved down the frame in the transfer process thereby creating a better composition which includes the wheels of motorcycle. However, the fact remains that while more flexible framing can be easily achieved when transferring to HDTV than can be achieved in an optical blow up to 35mm, a large portion of the already small standard 16mm image area remains unused when transferring standard 16mm to HDTV. This is due to the difference between the standard 16mm aspect ratio and the aspect ratio of HDTV. Any time less negative area is used to create the final image there is a loss of quality in the final image.
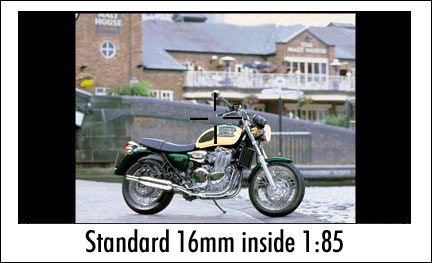
Before Super 16 the only other option when blowing up 16mm to 35mm was to put the standard 16mm frame inside of the 1:85 aspect ratio which would result in blacked-out bars on the sides of the 16mm frame– not a very attractive option:
Widening the gate of the 16mm camera to include the area normally occupied by the perfs creates an aspect ratio on the negative that is very close to the 1:85 ratio of 35mm. Much less cropping has to be done when blowing up Super 16 to 35mm. Shot on Super 16, the motorcycle scene would appear like this in the viewfinder of a Super 16mm camera:
When cropped and blown up to 35mm, this image would result:
Compare this image to the 1:85 image extracted from the standard 16mm source, and the benefits on Super 16 become readily apparent.
Unlike standard 16mm, when blowing up Super 16 to 1:85 very little of the image captured on the 16mm negative is lost, and the original framing is barely compromised. The resulting 35mm image has much more resolution than an image blown up from standard 16mm.
Shooting Super 16 for blow up to 35mm results in the use of almost 50% more 16mm negative area than shooting standard 16mm for blow up to 35mm. That’s a tremendous difference in image quality. There is also a much added benefit of not having to be as concerned about severe differences in framing when shooting Super 16mm for blow up to 35mm. Additionally, the aspect ratio of Super 16 matches the aspect ratio of European 35mm theatrical release (1.66:1), so it works perfectly when blown up for the European theatrical format.
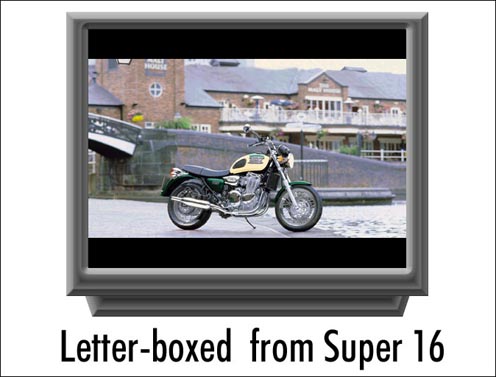
Until recently the use of Super 16mm added no benefit if the end use was standard definition television. Standard definition television uses the same aspect ratio as standard 16mm (4:3). The height of the frame is the same in standard 16 and Super 16. When the image on the Super 16 negative fills the frame top to bottom on a 4:3 standard definition TV the extra width of the Super 16 frame on the negative is not seen on the TV screen.
The only way a standard definition TV can display the full frame captured by Super 16 is to fit the Super 16 frame within the 4:3 frame. Doing this leaves an area at the top and bottom of the TV frame that has no image. These areas are usually filled with black, and the resulting image is called ‘letter-boxed’.
With the advent and increasing use of the High Definition Television format (called HDTV, Hi Def or simply HD). There has been a renewed interest in Super 16 not only because the added image area on the Super 16 negative captures the additional resolution necessary for HD but because the Super 16 aspect ratio is very close to the 16 x 9 ratio of HDTV. The motorcycle scene captured on Super 16 would appear like this on a High Definition television:
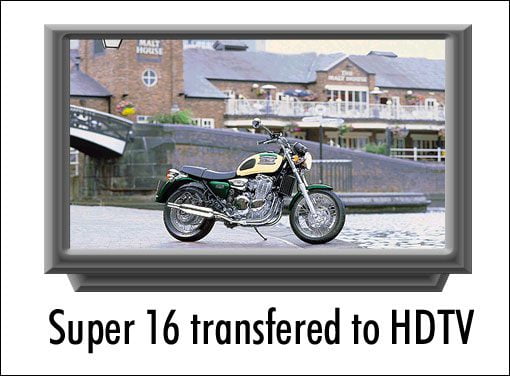
There is a small amount of cropping that has to happen on the sides of the Super 16 frame when transferring to HDTV, but it is quite minimal. Almost all of the area gained on the negative by using Super 16 is utilized when transferring to HDTV. Again this amounts to much better image quality than transferring standard 16mm to HDTV. There is also the issue of serious framing differences when transferring standard 16mm to HD. The 16mm image has to be greatly enlarged to fill the width of the HDTV format, and this enlarging causes serious image degradation. If the standard 16mm frame is not enlarged to fill the wider HDTV frame, black bars can to be placed along side the standard 16mm frame when it has been placed inside the 16 x 9 frame of HDTV. Again, not a terribly attractive solution:
So while Super 16 (unless letterboxed) offers no real immediate advantage for standard definition television, it offers tremendous advantages for High Definition television. It delivers higher resolution than standard 16mm blown up to fill the HD frame and uses an aspect ratio very close to that of HDTV so very little framing compensation is needed.
Additionally, it is important to keep in mind the idea of ‘future proofing’ your footage when choosing a camera. Eventually standard definition television will give way to HDTV. While it is true that Super 16 offers no advantage for standard definition TV, footage that has been shot on Super 16 is more ‘future proof’ because it can produce a 4 x 3 extracted image for use on standard definition television as well as an HDTV version, as long as the area in the 16 x 9 framing was protected when shooting (no mics, lighting instruments or other unwanted items appearing in the 16 x 9 frame). When shooting Super 16 you are capturing an image on the negative that will be easily transferable to standard definition TV and HDTV. It is also the best possible source material for blowing up to 35mm theatrical format both U.S. and European.
A Super 16 camera can do everything that a standard 16mm camera can do. However, there are definite advantages to a Super 16 camera that a standard 16mm camera simply cannot match
What is the best Standard16mm or Super 16mm camera choice for me?
THE ANSWER IS: “IT DEPENDS”
– Do you want a camera where if you held one in film school and years later you hold another one and want to use that muscle memory, maybe you’re looking at the Arri SR series. From the SRI to the SRII and eventually the SR3. They’re physically very similar cameras. They’re reliably built and many of the accessories used to built a kit with one will and can be used to built a kit with another.
-Or are you someone who dreams of being able to run and gun with comfort? Then you, my friend, are looking at the Aaton line. Known as the “cat on your shoulder” these cameras just get you as an operator. They feel good. They look great. It’s a new experience every time you operate one.
So in the end, what’s the right answer? It’s all about your style and what you WANT out of owning a quality film camera kit. When you’re ready to find out, we’re here and ready to help you figure it out.
Have any questions?